Joss & Main Exclusive online private sales for the home

Friday, February 22, 2013

Empty Frame Gallery Wall

I've finally added a bit of decoration to our master bedroom walls:

Most of the frames I already had (isn't amazing how many random frames you collect over the years?). I wound up buying the 3 biggest ones at Goodwill for less than $10 total. I gave each a good priming (especially the wood ones, they were the hardest to cover) then sprayed all but the one with Rustoleum Metallic Champagne Mist spray paint (same stuff I used on my foot-of-the bed bench).


I used Rustoleum Berry Pink Spray Paint on the "accent" frame for some pop and to match the flowers in the canvas photo.

I laid the frames on the floor to get an idea of how I wanted them. Then I cut out paper templates of each frame and hung them with painters tape so I could see exactly what it would look like before I starting putting nails in my wall. I wound up trying a few different options before I found one I was satisfied with.  Then I just nailed right through the paper... no measuring involved!  I wish I had hung them a tad bit lower, but it will have to do as is!
 
 
Next up - some art for the wall behind our couch in the family room!
 
How are you all doing with decorating?  Any fun new ideas?  I love seeing pictures of rooms as they evolve so please share!


Thursday, February 14, 2013

FREE DIY Colorful Coasters

This little project was free and sooooo simple, and I'm so happy with how they turned out (after a bit of trial and error, which I will share with you so you don't make the same mistakes I did :)).


All that's required is some (free) laminate flooring samples (available in any home improvement store), some (free) paint swatches and some glue and sealer.  Behr swatches are the best because they are already square so there's no cutting required.

I traced the corners of the paint swatches onto my flooring samples and rounded off the edges (regular scissors did the trick), but that step is optional if you're ok with square corners.


Then you just spray the back of the paint swatches with some glue, place it in the center of the flooring sample, let it dry for about an hour then apply a few coats of sealer. I used a glossy shellac, but I imagine any type of multipurpose sealer would work. As for the glue, I tried three different kinds and this elmers craft glue (shown below) definitely worked the best. Also, the shellac is some strong stuff so you'll want to do that step outside or in an open garage, but I found that really cold temperatures caused some bubbles to form in the coating. The first set I did when it was about 45 degrees was fine, but the second batch was done in below freezing weather and those formed some tiny bubbles in the coating.


These could make a great housewarming gift paired with some wine glasses or a six-pack of your favorite beer!


Monday, February 11, 2013

Family Room Gallery Wall

 
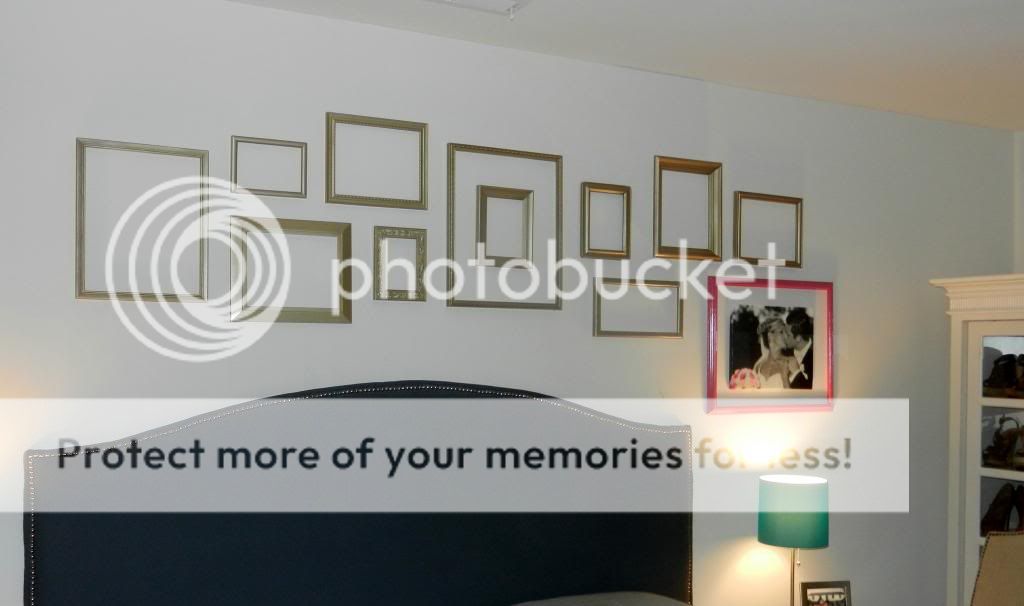
I finally finished the gallery wall that has been sitting on my living room floor for the past month waiting to be hung! I'm thrilled with how it turned out. I think it's the perfect space for that wall in our family room and will look even better once I hang some curtains on the flanking windows. Since we don't have kids, the theme is our wedding/honeymoon. It feels a bit narcissistic, but it will have to be that way until we have kids!

 
I did the old "draw the outline on paper and hang the paper on the wall" for getting the layout on the wall just right.  I took pictures of the whole process, but unfortunately they didn't turn out that well so I'm not showing them.  Here's a step-by-step for a similar method from AKA Design.  It took me about an hour to get everything hung just right.  


Besides the canvas prints, the other things on our collage are:

1. Framed pressed flowers from my bridal bouquet... just taped them to some fun craft paper and framed... easy peasy.
2. "M" that I received for my wedding shower... it took me 2.5 years to find the perfect spot for it!
3. "Montague's est. 2010" sign... also a wedding gift that hasn't had a good home until now.  (I painted the outside part black so it matched better... it used to be dark red).
4. The frame in the bottom right displays 4 pictures from our amazing Hawaiian honeymoon.
5. 4" L O V E letters from Hobby Lobby (on sale for $2.39 each)

I already had everything for the wall except the frame for the flowers, which I got from ikea for $3, and the L O V E letters which were cheap, so the total cost for this project was only $13. (Big thanks to my sis-in-law for having those wedding photos professionally printed for me!)    


Our new couches are coming tomorrow... I'm so excited!!!

Monday, February 4, 2013

Focus on the Family Room

Do you ever find it difficult to focus on one project at a time? We have so much empty space and random decor from previous houses in our home right now that I'm just jumping from room to room trying to update things. But I'm finding that I just wind up with several partially-finished rooms and no completely finished rooms. I am going to try to change that. 

I'm not delusional enough to think I'm actually going to succeed in channeling all of my efforts to one room, but I'm sure going to try!  My plan is to focus on the family room and only do projects in other rooms if they are essentially free.

Here's my "to-do/wishlist" for my family room:


We finally decided on and ordered couches last weekend. This is what we went with:

Don't pay attention to the pillows, I plan to get rid of them.
The furniture layout will be just about the same as a model of our house with two couches in an "L" shape opposite two accent chairs, like this:

I want to do my paint color scheme similar to this too.
Here are some of the things I want for the family room:
 
1. Coffee and console table something like this.

2. Two accent chairs... here are my options: Option 1, Option 2, Option 3, Option 4, Option 5 and Option 6.  I LOVE the target one, but I'm afraid the pattern won't work with some of the other patterns I already have in the room and/or won't be flexible in case I want to change something up in the future.  And as far as the gray options, I'm afraid it will wind up being too similar to the couches, but not exact, so it will look like a failed attempt at matching.  So I guess I'm leaning toward either the navy, peacock, black or really light gray one, but I can't decide!!  Any input is very much appreciated! 

3. Fake fireplace like this one on the wall opposite the couch (behind the two chairs):
 
http://www.buildingsimpleblog.com/2012/11/dining-room-makeover.html
I'm also working on a photo gallery which will go on that wall until we get around to building the "fireplace".  More on that to come!
 
Please share any thoughts... I'm totally open to suggestions!