

Hello
there! We are recovering from a long Labor Day weekend, filled with the beach and 30th birthday parties. I was so glad I finished this project (and another which I will share shortly) before the weekend so I could just relax the rest of the weekend.
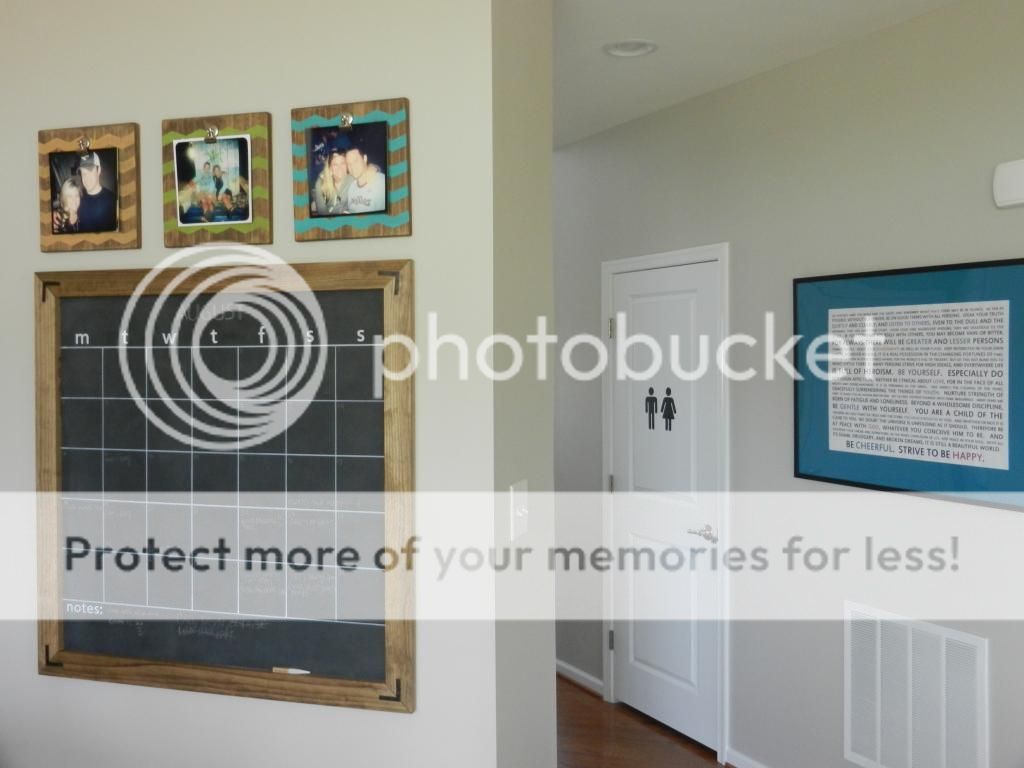
The last
thing I showed you was my DIY chalkboard calendar, which I hung on the giant
blank wall in the Courtland kitchen. I
think it was the perfect “wall art” for that space, but there was still a lot
of blank space above the chalkboard (I had to hang it somewhat low since I’m a
shorty). And I have been itching to do
something with all of my instagram pictures, so I
made these super-easy frames to display them.
First
off, it took me about two weeks to figure out how to get my instagram pictures
printed. I’m sure a lot of you have been
printing from instagram for years, but I am totally not tech-savy and had no
idea what I was doing. After asking
around, I found this app called Printicular, where I could just upload my
photos right from my phone and either get them delivered to my door for an
additional fee or pick them up at Walgreens for free. (Of course since I’m a cheap-o I choose to
pick them up at Walgreens). I have to
say, the pictures themselves were not cheap though. The 4”x4” ones were only 39 cents each, but
the 8”x8” ones that I wanted were $3.99 each.
But I could not find a place that did the square prints for
cheaper. If you know of something please
share!!
I am probably a weirdo (scratch that, I know I’m a weirdo), but I was soooo excited to pick up my pictures! It’s been so long since I actually went to the store to pick up photos, that I forgot how exciting it is! Remember before the digital camera age, when you didn’t even remember everything that was on your camera when you took it to get developed? That was so exciting! I remember walking to the CVS near my house when I was younger to pick up photos, then sitting on the curb outside the store to look at them because I couldn’t wait until I got home. Ah, those were the days… life was so much simpler back then. Ok, I’m done with my trip down memory lane… thanks for indulging me.
Back to
the frames... these guys are so
easy to make. Here’s what you need:
-1”x12”
wood of your choice (I used select pine)
-Stain
-Paint (I
used samples I had leftover from my painted back splash project)
-Paint
brush
-¾”
screws
-Sander
(optional)
-Drill
-Saw
And here's how to make them:
Step 1.
Cut.
Cut
your wood to the desired size. I made
mine 12”x12” for my 8”x8” pictures so that I had a 2-inch “frame” on all sides. 12”x14” would work for an 8”x10” photo.
Step 2.
Sand (optional).
Sand
your wood pieces and round off the edges/corners. I did this because I think the stain takes
better on sanded surfaces, but sometimes when I really don’t feel like sanding
I just leave it raw and 9 times out of 10 it still turns out fine.
 |
| The one on the left is sanded and the one in the middle is not. See the difference? |
Step 3.
Stain.
Stain
the wood pieces and let dry overnight. I
used miniwax “special walnut” to match my chalkboard, but I think these would
look awesome with a dark walnut stain.

Step 4.
Paint:
Apply
your chevron frog tape and paint with the color of your choice! Since these are going in my kitchen I used
colors to match my painted back splash (check out the tutorial for that project here). Remove
the tape right away, and let the paint dry for an hour or two.
 |
| TIP: After applying the tape, smooth out with a plastic trowel for cleaner lines. |
 |
| I only did one very light coat so that the wood grain kind of showed through. |
Step 5.
Sand (optional).
Sand
again for a “distressed” look if you want. I was
originally planning on doing this, but then I loved how they looked after I
painted them so I decided not to mess with it!
Step 6.
Attach
hardware.
Flip
the frame over, mark the center of the frame toward the top and attach your
hanger.
Then place
a photo in your bulldog clip, arrange on the frame where you want it, and mark the hole in your
clip on the frame. Finally, drill a pilot hole and attach your clip with a ¾” screw.


Step 7.
Add
pictures, hang and admire your masterpiece!


This project was very quick and easy to make, and I especially love it because it is so easy to change out the pictures. You don’t even have to take them off of the wall to change them, just squeeze the clip!
Do you
have another clever way you like to display your photos? Please share!!
I am linking up at these great parties... go check them out!
Link It or Lump It
The Makers
The DIY'ers
The Inspiration Exchange
Work It Wednesday
Create and Share
S.T.Y.L.E.
On Display Thursday
Inspiration Gallery
Creativity Unleashed
Inspire Me Please Blog Hop
The Makers
The DIY'ers
The Inspiration Exchange
Work It Wednesday
Create and Share
S.T.Y.L.E.
On Display Thursday
Inspiration Gallery
Creativity Unleashed
Inspire Me Please Blog Hop
*This post contains affiliate links*
No comments:
Post a Comment
I am so thrilled that you stopped by and I loooove comments! Leave me some love and I will respond shortly. Peace and love – Colette.