


 |
| DIY Burlap Curtains |

I really wanted these curtain rods from West Elm but at $100 per rod, I could not justify spending $400 on curtain rods for one room. So of course I decided to try to make them! I took my measurements and then brought my dad along to Home Depot since I had never been down the plumbing isle before. (I'm glad I did because I got some flack from the pipe-cutting-guy and some other random guy... the two of them and my dad had a 10-minute conversation about how Martha Stewert is the devil. lol). They cut the pipes to size and thredded them right there. I also needed some flanges and some street elbow joints:
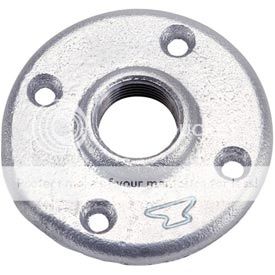


...it was the hanging part that got a little tricky. The galvanized steel pipes are quite heavy, so we tried several different types of hardware before we got it right. In the end these are the products that worked the best:

Some tips if you are interested in making these yourself:
1. Burlap kind of smells funny. I cut the panels and left them outside for a day or two to air out. Then I ironed each one on the steam setting. It really helped lessen the smell. Leaving it outside also helped get rid of some of the little dusty pieces that come with burlap.
2. Pay close attention to how they cut it at the store when you buy the burlap. There's a technique to cutting it straight and making sure it doesn't fray.
3. You definitely need the steam setting for ironing on the stitch-witchery. My iron setting wasn't working at first and it didn't work at all without the steam.
4. DO NOT try washing burlap! I tried this with the first panel to try to get the smell out and I wound up with a piece completely frayed with wrinkles that would not budge (and it didn't help the smell).
5. I'm not sure how I'm going to wash the curtains when the time comes. I guess I'll cross that bridge when I come to it :).
What do you think??
Great job! They look wonderful (and how much nicer are they that they weren't $100 per rod?).
ReplyDeleteGreat DIY tip! So I guess you'll never have to worry about your curtain rods rusting... ;-) I wonder if you could have done something very similar with hardware from a boating supply? The flanges look similar but you would have used braided cable instead of a pipe and there are different finishes (i.e. Stainless, chrome, etc.). You've inspired me, now I'm going to go check this out.
ReplyDeleteI love that idea! Any suggestions on a good online boating supply company?
DeleteNice top, I saw something similar on pinterest, but you have done much better directions.
ReplyDeleteI have also seen curtain rods with PVC pipe(lighter weight if you are worried about the weight on the walls.)
www.romeiswheretheheartis.wordpress.com
What a great idea !! They turned out beautiful !! I absolutley LOVE the colors for your family room !!! cant wait o see the whole room together !!!!
ReplyDeleteThanks! I am sooo close to being done, but I still a few more things to finish/buy and I really want the whole thing to be done before I share. We'll see if I can hold out :).
DeleteThese came out fantastic and I love the idea of the pipe rod. Nicely done girl :)
ReplyDeleteThanks Jessica... thanks for the inspiration!
DeleteYou are so creative! The rods and curtains are amazing, and I would love to try something similar! We are just starting our RH and your blog has been so helpful!
ReplyDeleteThanks so much Chrissie! And I'm glad you are finding my blog helpful. I started following you and can't wait to see your finished house. Good luck and congratulations!!
DeleteThese are so adorable. I've been thinking abou some things that could spruce up my house and new curtains would do just the trick. I love your blog...I'll definitely be doing a lot more exploring!
ReplyDeleteThank you! Thanks for stopping by and I hope you stay a while!
DeleteI can't believe you made those curtain rods!! I just got our new duvet from West ELm and I was looking at those neat rods, but why are they so expensive!! THat is just awesome that you made them (and went with your dad who thinks martha is the devil!) great story.
ReplyDeleteI;m in love with your family room and your blog. I'm adding you to my blogs to keep up with! I love DIY. They should have a DIY school for girls who are mathematically challenged! I'd go! I'm going to go back and see how you did some other things!
#SITSBloggin love!
Thanks Dawn! I know, I can't understand why the west elm ones are so expensive! Thanks for stopping by!!
Delete