Joss & Main Exclusive online private sales for the home

Friday, January 31, 2014

Blog Changes

A few people have inquired about the recent changes to my blog layout, so I figured I'd share some of what's been going on behind the scenes here.  Some of the new additions to my blog include adding a photo header that highlights some of my favorite projects, creating a project gallery page, adding "Pin it" buttons to all of my photos, and adding a "Share this" bar at the bottom of each of my posts.  Read on if you'd like to find out how I did each of these!

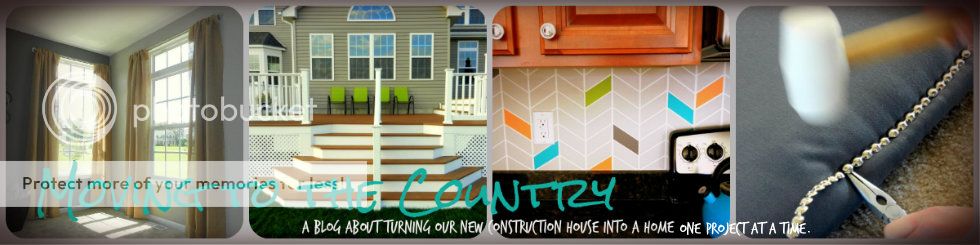
1. Project highlights photo header.  I edit my photos in Picasa because it's free and easy to use.  (However I am currently in the middle of a 30-day free trial of Photoshop and it's reallllly making me want to shell out the extra dough to have it permanently.  We shall see).  The one thing I can't seem to get the hang of in Picasa is making collages.  So I did some research and found this other (free) site, Pixlr which has really easy collage-making functions.

To make a photo collage for a header, you first need to find how how wide your blog is.  You can do this on blogger by going to Template>Customize>Adjust Widths... at the top, the number to the right of where it says "Entire Blog" is the width you want to use.  Mine is 980 px.  Jot your number down.

Then go to Pixler.com and click on Pixler Express>Collage.  Click on the box at the bottom that says "layout" and choose one of the short and wide options for a header.  Add your pictures by clicking on each box, zoom and position them in the box the way you like, and play with the spacing, colors, etc using the options at the bottom.  Then click finish.  (I forgot to mention that you should edit each individual photo before uploading it to your collage.  Once you click "finish" it turns it all into one file and you can no longer edit the individual pictures).

Next, click the "Adjust" box at the bottom left and choose "resize".  Here you want to enter in your blog width as the photo's width.  Make sure "Keep proportions" is on so it doesn't distort your pictures.  Then click "apply" and it will take you back to the main menu where you can add text, borders, etc.

To add your collage to your blog, go to Layout and click edit on your header gadget.  Upload your picture. If you have your blog title on your photo, check the box that says "Instead of Title and Description".  You still need to put something in the title box, but it won't show up.

Bam... a fancy blog header... easy peasy!!


2. Project Gallery page.  This one, I will admit was not quite "easy peasy".  It's not really difficult, but tedious and a tiny bit scary because it's all html code (made me with I had paid more attention in my college programming class).  Craftivity Designs has an awesome "beginner-friendly" tutorial, which is what I followed my make my project gallery page.  I still want to make a few adjustments, but it will do for now.

3. Pin-it buttons for photos.  This is another one that was kind of intimidating because it required html coding AND CSS, but I tried it out and it worked, so I'm confident that you can do it too!  Code it Pretty has great tutorials for all kinds of fancy blogger stuff.  I used the basic "pin it" buttons tutorial, but she has since added several different options, which seem to be a bit simpler than what I did.  Apparently Pinterest came out with "official" buttons that are much easier to install.

4. "Share this" bar at bottom of posts.  I used this website to add the "Share It" bar at the bottom of each of my posts.  There is an option for blogger (and also for wordpress) that makes it really easy.  You can customize the look and choose which social media outlets you want to include.


A lot of this stuff is probably second nature to a lot of you seasoned bloggers, but it's all new to me and I'm learning as I go!!  Hopefully this helped some of you out there who are beginners like me!  Leave me a comment if you decide to try out any of these... I'd love to know how you make out.

Have a great weekend everyone!  Hopefully next week I will be able to show you my painted study!

Wednesday, January 29, 2014

Beer Box Magazine Holder

An empty 12 pack Corona Light box (my beverage of choice) was sitting in our laundry room waiting to be taken out to the trash.  I thought it looked like it would be just the right size to hold magazines, so I quickly grabbed one of my HGTV magazines and tried it out.  What do you know... it was a perfect fit!!  So I cut the box in a "magazine-holder-type-fashion" (that's a technical term), wrapped it with some brown paper, and added some twine and raffia to dress it up.  Brown paper was all I had a around the house, but I bet it would look cool with some fun wrapping paper too.  (The Container Store is my favorite place for fancy wrapping paper fyi).

So in 10 minutes, with zero dollars, I turned trash into some fun storage!   This will be going in the study once I finish the built-ins.


I'm linking up at this link parties... go check them out! 

Tuesday, January 28, 2014

House Painting - Tips and Tricks

My trip to NYC was cancelled this weekend (huge bummer :(), but having a whole weekend of unexpected free time made me extremely productive.  I painted our master bathroom, bought the cabinets for our built-in base and started painting the study.  The master bathroom took FOR-EVER to paint because there were so many obstacles to cut around.  As I was painting I got to thinking about how much I have learned since the first room we painted, and I figured I'd share some of the mistakes I've made and things I've learned with you all.  A coat of paint can make such a difference... especially in brand new homes like ours that are completely white.  A little bit of color on the walls is a cheap and easy way to make your house "home-ier".

My step-by-step process for painting:

1. Remove all light switch covers, decorations and other removable fixtures.  In the bathroom, this includes the towel and TP bars.  The builder grade ones come off easily... you just need a tiny screwdriver.  Look under each side piece and you'll see a tiny black "button".  Just push that button in with your tiny screwdriver and pull the piece off.  Some of the nicer fixtures require an allen wrench, but it's basically the same idea.

2.  Examine your walls for any holes or dents and fill them in with spackle.  This is the stuff I like to use because it's sand-able/paint-able within minutes. 

3. Dust off then tape your baseboards.  The first room we painted I taped off everything... the windows, ceiling, adjacent walls.  I quickly found that that was totally not necessary and a waste of time.  I practiced cutting on a few taped areas to get the hang of it and realized it was much quicker to cut in rather than tape everything.  And now I love cutting!  I'm probably a wacko, but it's really therapeutic for me.  It requires just enough concentration that I can't think (worry) about other things, but not so much that it's stressful.

4. Sand your walls.  I found that we have lots of little bumps and imperfections on our new walls, particularly around seams in the drywall and near corners.  Just a light sanding makes a big difference in the quality of your painted surface.  After sanding, use a dustbuster or swiffer to dust off your taped baseboards so you don't get dust particles in your paint.  I like to tape before the sanding step, because the tape doesn't hold as well with even a little fine dust on the baseboards.

5. (Optional).  Some people recommend washing your walls with a damp sponge after sanding, but I have found this not to be necessary.

6. Cover your floors with plastic or canvas drop cloths.

7/8.  Roll/Cut.  The order I do these in depends on the room.  I think it's more efficient to roll first.  This way you can cover as much area as possible, then only cut in where needed.  If you cut first, you'll often cut more than you need to, which wastes time and energy... or you'll cut less than you need to, and then you have to go back with the brush after you roll anyway.  Cutting second also allows you to get up close to the wall to find any areas that might need a little touch up.  My only exception to this suggestion is in complex or small rooms that require you to contort yourself and lean on walls to reach all of your corners (like bathrooms). 

I like to use an extender (i.e. a metal broomstick screwed into a paint roller) and roll all the way from the top of the wall to close to the baseboards as I can so I don't have any lines in the middle of the wall.

9. Look over your room very carefully.  So far every room I have painted I have missed a spot that I didn't notice until I was all cleaned up.  So frustrating!

10.  I typically wait about 24 hours to remove my tape and replace my fixtures and outlet covers.

Tips and tricks:
 
1. My dad bought me this brush with a really short handle that is awesome for getting in ceiling corners and other tight spaces.  I highly recommend investing $5 and saving yourself some aggravation.  
2. If I need to step away for any length of time, I just wrap my brush, roller and pan in saran wrap.  This will keep it fresh for a couple of hours.
3. In the RH bathroom, I found that I was able to easily cut around the mirror since it is not flush to the wall.  I also found that I could just loosen the two knobs on the light figures, pull it away from the wall a little bit and cut around/under it. 
4. Frog tape is the best.
5. Expensive paint doesn't always = better quality.  My absolute favorite is Glidden Duo (Paint and primer in one) in eggshell finish.  In my opinion this covers better than any of the other name brands I have tried.  I have never had to do more than one coat and the finish is great.  It is sold at Home Depot (for only $27 a gallon) where they can match any color, so you can get a color from another brand if you have the swatch.  They also advertise that it has mildew-resistant properties, which make it a good choice for bathrooms.  
6. Going along with #5, I prefer an eggshell finish for most wall applications because it looks almost like flat, but cleans up much better.
7. I don't paint the inside of window wells... it saves a lot of time and I don't think anyone can tell the difference. 
8. Don't cheap out on your rollers.  The cheap kind leave fuzzies on your walls (I'm dealing with this in the study now :()
  
And now for a picture of our newly painted master bathroom.  I am so in love with this color... it's Spring Stream in (Glidden Duo Eggshell, of course)  It makes me feel like I am at the beach!  Soooo much better than the all white "before" shot.  Now I don't hate our plain white tiles quite as much!  I still have quite a bit of decorating to do in here, but I'm so happy with the difference a coat of paint has made.

After
Before

Do you have any tips for painting?  Please leave a comment and share your knowledge!

Thursday, January 23, 2014

Home Office Ideas

I am heading to NYC this weekend for a mini-getaway with my college roomates, so I won't be working on the house at all.  I do, however, have a date with my dad on Friday to check out base units for our built-in desk/bookshelves.  (When did it happen that I'd rather spend my Friday nights at Home Depot than at the bar?)  I am planning on using unfinished kitchen cabinet bases and cutting off the bottom toe-kick part to get it pretty close to the standard 30" desk height.  Here's an example of someone who did this... I think it turned out great: Home Office Before and After.  The only tricky thing I foresee is the how to do the base unit for the angled part of the wall, but we have a couple of ideas marinating.  For the wood desktop, I am between a stained butcher block counter-top (which is pretty expensive) and just throwing some 2x's together similar to this.  Normally I prefer to go with the cheapest alternative, but now that I'm a "grown-up" I'm trying to remember that sometimes it's better to spend a little extra money for something of better quality that will last longer. 
 
Check out my pinterest board to see some of my ideas for the built-ins and some other items in the room (such as the curtains and rug I just ordered from Crate and Barrel... crossing my fingers that I like them when they arrive!).  

The one thing I wanted to do for the "reading nook" in the corner is re-upholster a wing back chair that currently belongs to my dad.  I have been looking at local re-upholsterers and it seems like it could cost anywhere from $500-$700 to have it done by a professional.  Since I could buy a brand new chair for that amount, I think I might have a go at it myself.  I have been researching DIY re-upholster tutorials online and it seems like it's possible with a little skill and a lot of patience.  Now I just need to make sure my dad is willing to give me the chair :). 

Have you ever tried a somewhat complicated DIY re-upholser?  If so, how did it turn out?  Any tips?

Sunday, January 19, 2014

Hardwood Floors in the Study!

I am writing to you from my couch where I sit sore and exhausted, but it was worth it because.... the hardwood floors in the study are in!!  Woohoo!!  I am so happy with how they look.  I swear they make the room look bigger.  The floors were very easy to put in from a skill standpoint, but geez it's a lot of labor!  I estimate that I did about 200 squats these past two days.  And while the floor-nailer is an awesome tool, swinging the sledge hammer hundreds of times is no walk in the park.  However, we did it for about half of what the builder was charging (saved about $700.00), so I am definitely happy with our decision to DIY it.  It took two 8-hour days with two people working to complete them (plus about 2-3 hours to rip out the carpet, padding, staples and nail strips).

Before:

During:
Sweet knee-pads dude!
After:
Sorry about the poor picture quality.  It was getting dark when we finished, but I couldn't wait to take pictures!
Next up is are the built-ins.  I have started working on the design.  More to come shortly!

Hope everyone had a great weekend!

Tuesday, January 7, 2014

Layout Plans for the Study

The first big project of 2014 for us is going to be our study.  The main reason we want to get this room complete is to get organized.  All of our documents are still in boxes from when we moved.  It's really a pain to have to dig through a bunch of dusty boxes whenever we need to find something. 

Here is the "before" picture of our study (this is from before we moved in, it's a little messier than this now):


I have a pretty good "big picture" idea of how I want the room laid out.  I want to do a built-in desk and some shelves on the back wall, a freestanding desk in the middle of the room facing the big window, and a file cabinet next to the french doors. 

I drew this up from the dimensions on our floorplan, but it seems off to me.  I'll have to do some manual measuring.

Other than the layout, however, I have no vision for how I want the room to look.  I can't decide on style or colors or finishes.  Some days I like a blue-green paint with white furniture for a bright and cheery look... other days I like a dark wood tones and grays for a more masculine look.  The room is small, but it gets a lot of light, so I think I would be ok with the dark colors.  I'm hoping once we get the built-ins and the hardwood floor in, I will start to get some color inspiration.

I want to do something sort-of like this for the built-ins... a desk with cabinets and shelves above.  I definitely like the white with dark wood-stained desktop.  I will modify the layout a little, but more to come on that later. 
Here is the list of tasks/projects for the study:
 
1. Install hardwood floors.
2. Build built-in desk/bookshelves.
3. Install crown molding.
4. Paint.
5. Install window treatments.
6. Buy freestanding desk.
7. Re-finish file cabinet.
8. Buy area rug.
9. Lighting.
10. Decorate.
 
I have a date with my dad tomorrow to go hardwood floor shopping so hopefully we can get this ball rolling soon!  Our Home from Scratch has the same model home as us and they are working on updating their study too.  Maybe we can have a race to see who finishes first :).  I'm pretty sure it will be them since they already have their hardwoods in and they have lots more experience than I do with built-in units.  A girl can dream though!
 
Please offer input/suggestions... I am totally open to new ideas!

Friday, January 3, 2014

Drop it Like it's Hot

I had been frustrated with how everything we brought into the house seemed to wind up on the kitchen island... mail, bags, jewelry, keys... you know the deal.  So I created a small space right next to the garage entrance to our house (where we usually come in) to drop our things... the DROP ZONE!  I was originally calling it the "command center" as I've seen it sometimes called around the interweb, but Greg told my family we called it that because that's where I command him what to do.  Haha.  So I changed the name to the drop zone :).


The hooks are for our keys and the occasional scarf.  I have been hanging coupons I get in the mail on the cork board so I remember to grab them when I go out shopping.  I actually just got a sweet chevron cork board for Christmas so I'll be switching that plain one out.  I have been eyeing that @ sign for so long and I happened to see it on sale at HomeGoods the other day for $7.  Score!

The green magazine holder is from Three by Three Seattle.  It has these cute little magnets that are surprisingly strong.  The board on the right is a chalkboard for writing important dates.  I have an idea for a calendar I may put there instead, but I like this for now.  The little wire basket is from a general store near me and holds incoming mail. 

The little bowls are from Target and catch jewelry and spare change.  The little tray is just an old mirror that I spray painted.  The teal paperweight is from West Elm and $5 of each purchase goes to St. Jude Children's Research Hospital.  My mom really loved St. Jude's, and after she died my dad bought a memorial brick at the hospital in her honor.  Because of that, we were invited to visit the hospital in Memphis a few years ago.  It was one of the most touching experiences of my life.  Seeing all of those sick kids and how positive they are makes my every day problems seem so trivial.  I believe the worst thing in the world is a suffering child, and St. Jude's does so much to help these innocent children.  I urge you to check out their gift shop or consider donating.  We decided to make a donation to St. Jude's in lieu of favors for our wedding... they give you these cute little bookmarks to give to your guests.

And to wrap up this post, for once I stuck to my self-imposed scheduled and installed my under-cabinet lighting on New Years Day!  Nothing like checking something off of my 2014 list on the first day of the year!

Thursday, January 2, 2014

2014 Plans

It's the moment of truth... time to compare what we accomplished this year with the list I made last January!  We only completed about 1/2 of what I hoped to, but we also did some other things that weren't on the list.
 
The biggest things on the list that we completed were the deck, the family room and the garden.  We still have a long way to go on the master bedroom and the guest room.  Regarding the foyer, I keep going back and forth on whether I want to hire someone to do it or try to do it ourselves (we would need scaffolding since it's a two-story foyer).  We did do some landscaping this past year (we planted 3 trees and about a dozen shrubs/bushes), but there is still a lot more I'd like to do.

Besides the things on this list, I also got the powder room about 90% complete, created a "drop zone" area just inside the garage entrance to the house (I keep forgetting to post a picture of it) and painted a back-splash in the kitchen.

After living in the house for a year and seeing which areas we use the most (and learning how much time projects realistically take to complete), I am switching gears on a few things for 2014's goals.  Here's what I hope to accomplish is 2014:

 
Here's little more detail on each item:
 
1. Kitchen lighting: I already installed the under-cabinet lighting (pictures to come!).  I also want to install a pendant above the sink and another fixture above the island.  I also want to make or buy some window treatments for the morning room, but I cannot decide what kind to do.  
2. Study: I want to paint, install hardwood floors, build a built-in desk and bookshelves on the one wall, buy a freestanding desk for the middle of the room, re-finish an old filing cabinet, install crown molding, decorate.
3. Guest room: Paint, install board and batten trim, possibly build a headboard, build a mini-bookshelf, build/buy nightstands, install window treatments, decorate.
4. Paint and install decorative moulding in foyer... hopefully we get to it this year. 
5. Install trim in the first floor doorways.  I want to do something like this in the bigger doorways and like this in the smaller ones.
6. Paint the master bathroom.  I already have the paint bought, I just need to get taping!
7. Build landscape retaining wall out front... this is something I was really hoping to get to this year, but it just didn't happen.  I want to do something like this or this in the front of the house.
8. Plant more trees/shrubs... I think this is going to be an ongoing project every year!

Anyone else have any big plans for 2014?